- I used Tim Holtz Distress Ink Black Soot and applied it to a Darice Embossing folder and then ran it through my Big Shot. I just love this technique! The results always impress me and can really add a cool texture to a card.
- I cut the pieece down to 3 3/4" x 5" and adhered it to a piece of black card stock cut to 4" x 5 1/4"
- After I glued my pieces down I added it to a A2 size card (4 1/4" x 5 1/2").
- Then it was time to decide how I wanted to place the coat. I used a glue that has a really strong hold once it dries. It's one of my favorite glues. It's made by Lake City Craft Company and I use it for a lot of my crafting.
- I have been saving this sentiment for my granddaughters card and I was SO excited to be able to use it. Santa's hat had to hang from the edge. It was so obvious to me it belonged there.
Thursday, November 5, 2015
Santa's Button's
Hi everyone! How's it going? I had a trip to the craft store and look what I found. As soon as I saw this Santa Suit I knew I had to have it. I wasn't sure what I was going to do with it, but it came to me in the middle of the night. My Granddaughter is going to love this card. She is 4 1/2 yrs. old and loves when I send her cards. I try to keep them simple so her little sister, who's almost 2 yrs old, can't get hurt if she gets a hold of it. I send cards to her also but I try to keep them a one layer card. It's so much fun bringing smiles to their little faces! Do you send cards to small children in your life? Do you keep the design simple also? I would love to see what you do for them! Here's what I did.
Wednesday, November 4, 2015
Baby It's Cold Outside!
How are all of you doing? The weather is changing here and I didn't sleep well. While I laid in bed last night, praying for sleep, my mind was running a marathon of thoughts. Do you ever do that? I should've got up and just came to my craft room....I started getting excited about the idea's I had and sleep escaped me even more. I LOVE the exhilaration no matter when it comes! Don't you? I found myself rushing through my shower so I could get in here and start putting things together...Hahaha My happy place...I LOVE it in here!
So, I got started on water painting a Bird stamp I bought from Unity Stamp Company. Have you ever checked out their stamps? They have such beautiful stuff and I find it easy to create with them. Here is my card. I went a head and took the picture with a background instead of my messy desk :)
- This card was very easy to do. I used the Own Wings stamp from Unity Stamp Company. I stamped it with Black dye based ink onto water color paper.
- I water color painted the bird using Tim Holtz Distress Markers. I used the markers to color the branch, hat and scarf.
- I cut the paining out using the Regal Label Die from Sizzix.
- I used red button shaped brads to attach it to green card stock cut 4 1/4" x 5 1/2". The bow was glued under the label and the sentiment was glued under the branch.
This was a fun card to make and went together quick. I'm not happy with the clouds but now I know not to do them that way next time...lol I want to thank you for stopping by and checking out my card. Make sure to leave a comment or any idea's you might have. I really appreciate your comments. Oh, let me know a better way to do the clouds. It would be helpful to me to find a better way to do them. Thank you and have a GREAT day!
Tuesday, November 3, 2015
Simple and quick Holiday card
Hey Hey Hey Everyone!! How's it going? I hope that your all having a great Autumn day! We actually had the sun out for a little bit today and that always puts me a happy creative mood. My dog, Daisy, has been goofy all day. She won't leave my side and I find myself stumbling over her as I move around my craft room. She gets like this sometimes when I'm not doing well. Dogs are so intuitive aren't they? I don't know what I would do without her! Do you have a favorite pet? Please post a picture in the comments I would love to see them! Here is a picture of my baby. Isn't she adorable?!
I kept the card for today simple but very pretty. This is a Christmas card that I have had in my head for a while. I'm so happy it turned out so pretty. Never mind my messy desk in the background. I will be working on a better place to take my photo's this week.
- I started with an A2 card (4 1/4" x 5 1/2") I cut a piece of red card stock from my stash the same size and glued it to the card.
- The snow flake card stock is Winter Wonderland from My Minds EYE. I cut that 4" x 5 1/4" and glued that in the center of the card.
- Then I used my medium from Ranger and the Merry Christmas stamp from a Hero Arts set #CL498. I sprinkled a red tinsel embossing powder over the sentiment and heat set it.
- The card just seemed like it needed something more, so I took one of the snowflake dies, from Simon Says Stamps Snow Flake Die set, and cut a snow flake out of a piece of white card stock covered in red tinsel embossing.
- It was glued onto the sentiment tag using my favorite glue. The glue is from Lake City Craft Company and it works great for all different crafts.
- The sentiment tag still needed something to tie it all together. So I cut a piece of the red card stock 1/4" larger then the white tag. The white tag was adhered to the red piece.
- Foam Dots were used to adhere the tag onto the lower right corner of the card. By doing this the card has a little dimension and it makes it more interesting.
So that's the finished card. I hope you like it. Please keep checking back and I would really appreciate it if you could leave a comment below telling me what you think. I value your Opinions so much and I'm excited to learn from all of you! Thank you for stopping by and Happy Creating!
Monday, November 2, 2015
Sharing Handmade Kindness
I have to tell you I really struggle with this and I need your opinions! When I take the pictures of my work should I have a staging area where everything is tidy and neat? Or is it better to take the picture right on my crafting desk.I just can't make up my mind...I feel as though staging gives off the idea my craft room is neat and tidy all the time and that couldn't be further that the truth. I start each day cleaning off my desk before I craft and by the time noon hits I have stuff everywhere. A messy desk is where the creativity flows, right??? please I want your thoughts on this so leave me a comment below. On to the tutorial shall we!?
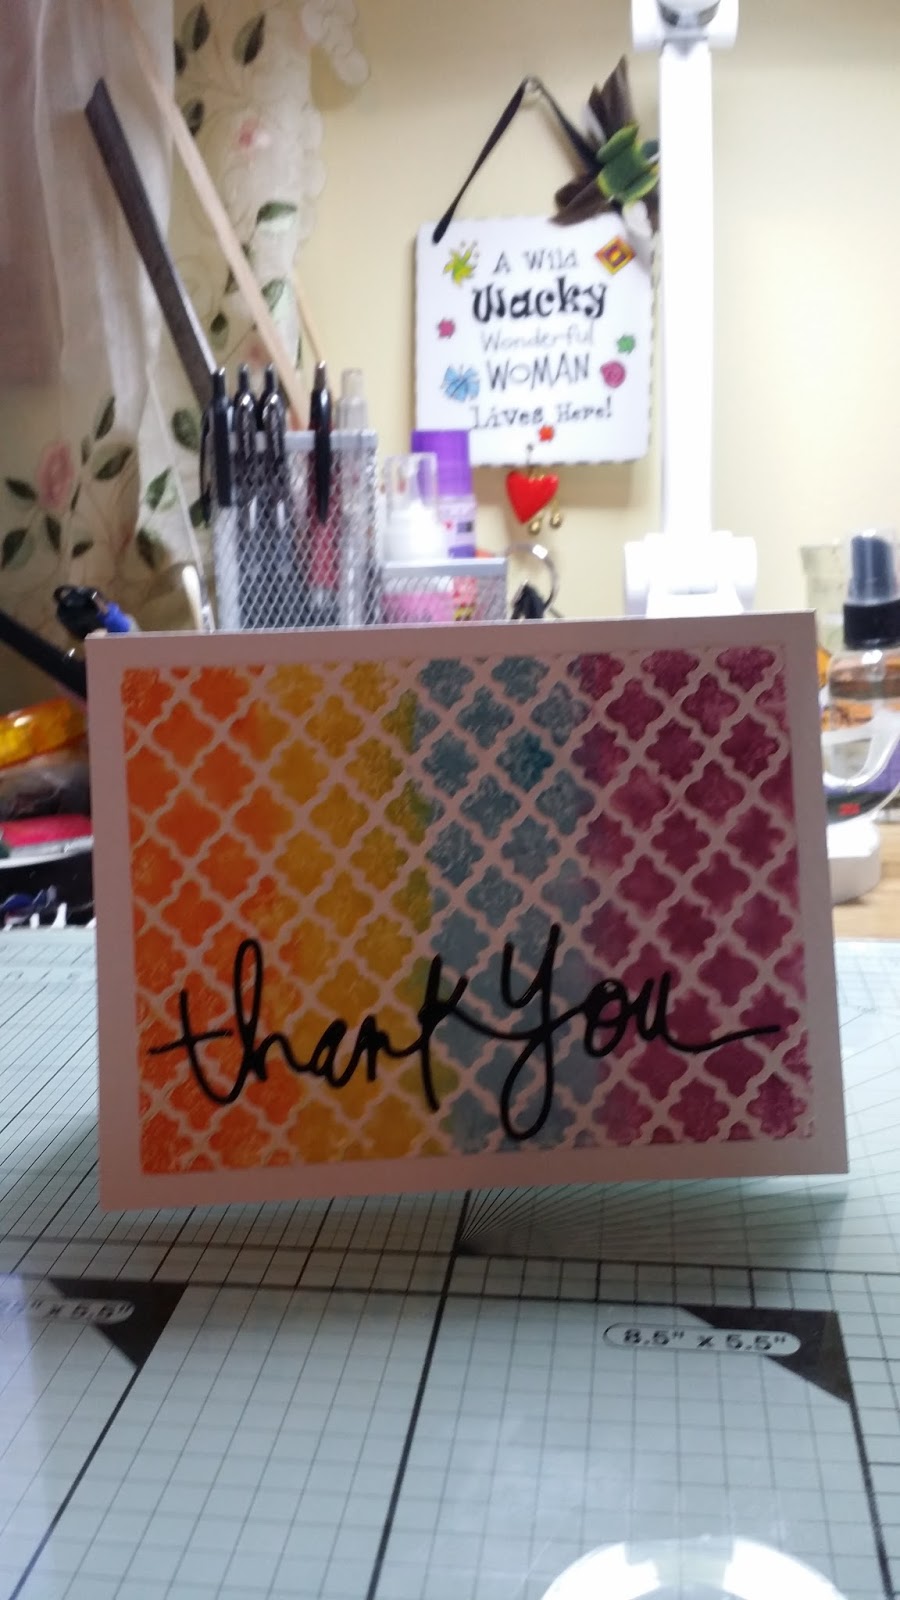
- I started out with an embossing folder from Paper Studios and watercolor paper cut to 5" x 3 3/4".
- The embossing folder has two sides. For this card I applied spiced marmalade, mustard seed, broken china, and seedless preserves from the Tim Holtz Distress Ink to the smooth side of the folder.
- You need to be careful and make sure the paper doesn't slide, or smear, when placing the paper inside the folder. Then run your embossing folder through your machine. I use the Big Shot but anyone of them will work.
- Look how beautiful the ink transfer is! Its instant results and looks awesome! I glued my paper to the card once it was dry. Make sure to clean the ink off of the embossing folder when your done.
- Isn't the sentiment "Thank you" Pretty? I love the Script! Its a Die by Hiedi Swapp. I heat embossed a section of paper big enough for my sentiment die with black heat embossing powder.
- Once the black embossing cooled off I ran it through my big shot using the Hiedi Swapp Die and adhered it to the front of my card with tiny spots of glue. I love the end results and its a quick card that could work for any occasion.
I can't tell you how much I appreciate your comments so please be sure to leave me a comment below letting me know how you feel about how I take the pictures. Thank you so much for stopping by today. Oh, don't forget to head over to Jennifer McGuires blog and take part in her campaign!
Oh Christmas Tree...
Good Morning! How are you doing? We have been busy getting ready for snow. I had to stop crafting for a little while and go outside to do chores..YUK! It was a nice Fall day so I really didn't mind that much. I love to garden and it's really hard for me to put all of my lawn ornaments away and get everything ready for winter. I'm always sad to say goodbye to my beautiful flowers and all the lovely summer birds we have here in Minnesota. The Orioles and Hummingbirds left a few weeks ago. I'm excited to see more of the Cardinal's during our long cold winter. Being outside and watching the birds and other little critter's has always brought me so much joy.
Today I have an Origami Christmas Tree card for you. It's so pretty when its done and is just a tad more challenging to explain so please bear with me here as we go along. I promise the end result is gorgeous!

Today I have an Origami Christmas Tree card for you. It's so pretty when its done and is just a tad more challenging to explain so please bear with me here as we go along. I promise the end result is gorgeous!
- Start by cutting 4 squares of your favorite Holiday paper. I am using the same pattern on all 4 squares, However, you can mix it up and use different patterns if you want. I'm using a 3", 2 1/2", 2" and a 1 1/2" squares. You can use any size really as long as you make them all a 1/2" smaller then each other.
- Take one of your squares and fold it in half with the pattern inside the fold. Then fold it in half the other way so that you end up with 4 square folds when you open it up like you see here.
- Now you will take the square and folding it with the pattern side out into a triangle. Then you will open it up and match the other two corners to fold it in a triangle again. It may take a little practice but when you open it up it should look like this.
- For the next step you will hold two corners, opposite each other, and push them to the center until the papers meet. You will then fold it into a large triangle like this.
- For the last fold you will turn one corner into the center line and fold and do the same from the other side. You will need to fold all four pieces the same way. When you are done with all your folds they will look like this.
- Okay so lets get ready to assemble our tree. For the background I took 5 1/4" x 4" paper and I used a Snow Flake Die Set from Simon Says Stamps and embossed them on to the paper with my big shot.
- I used Tim Holtz Distress ink Broken China and a small sponge to blend the ink onto the paper. I allowed the ink to fade the closer I got to the middle of the paper.
- Taking the largest origami piece we will adhere toward the bottom center of the paper. Make sure NOT to glue the top of it down quite yet.
- You will take the next largest size and slip it over the top of the piece you glued down. Your tree will start to take form now. Always remembering not to glue the tip down and continue adding your pieces in the same fashion.
- I added a gold star on top of the tree, some sequins and my sentiment before adhere the final piece to the front of the card. There are so many ways to use this tree. Let your imagination run with it. Here are some examples of the tree's I have done.

This is a lot of fun to do and you can get the children, or grandchildren, involved. I love crafting with my Grandchildren and watching their eyes beam with pride when they finish a project! Please leave me a comment in the section below letting me know what you think. If you have any questions regarding today's tutorial feel free to ask. I am VERY interested in hearing what you have to say. I hope everyone has a Great Day!!
Sunday, November 1, 2015
Hi Everyone I hope all of you had a fun and safe Halloween. I had a birthday party to go to yesterday and of course I had to dress up! I had a lot fun! There weren't as many trick or treater's at our door this year :( I always enjoy seeing the costumes and the smiles the children have on their little faces! Here's my costume. The kids had a lot of fun with this as did I.
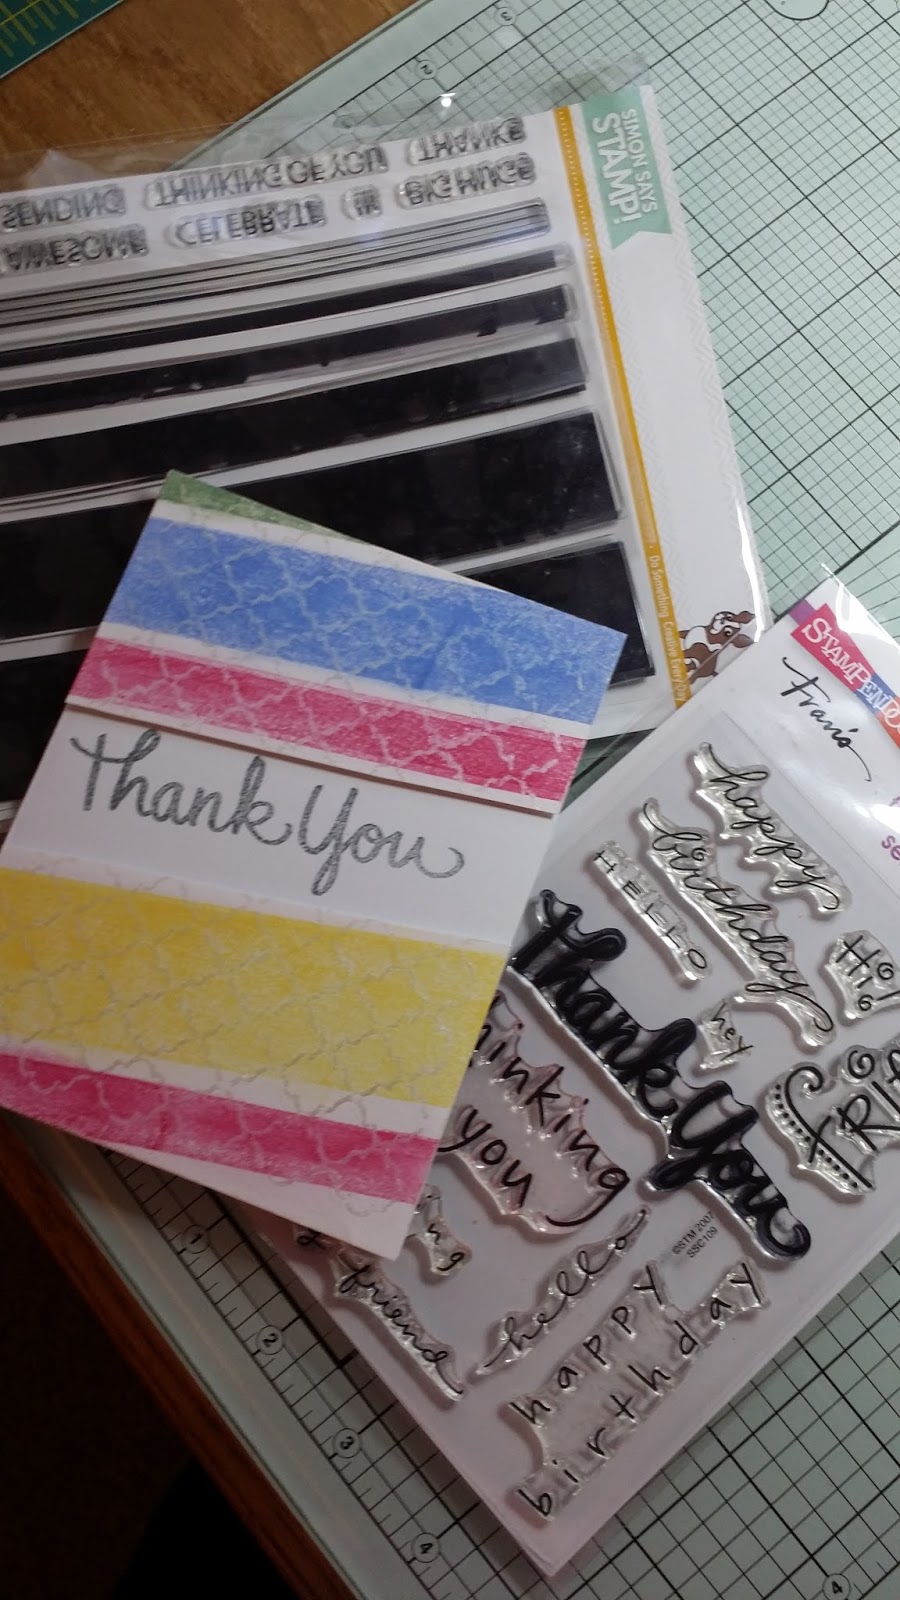
I would love to see what your costumes were so please feel free to add your photo's in the comment section below. Well, should we get to the card I made? I made this for the Jennifer McGuire kindness campaign. This is a spin off from something I saw Jennifer McGuire do a video on not to long ago. I found the card to be so pretty I had to try it.
- I started with an embossing folder from The Paper Studio. I love Embossing folders! The uses are unlimited. A background stamp might work a little better but I don't have backgrounds stamps at this time.
- I stamped the raised side of the folder with Perfect medium from Ranger and then I placed a 4 1/4" x 5 1/2" card stock on top and gently rubbed the paper to transfer the medium onto it. This can be tricky. You have to make sure you don't slip the paper around.
- I then used white embossing powder and heat set it (When Jennifer did her card she used white ink.)
- I used the Jumbo Stripes from Simon Says Stamps and used Fuchsia, Buttercup, Seafoam and Hydrangea chalking ink from Powderpuff. I guess we have to learn from trying right? I see now that I should've used a different ink. Chalk ink dries so fast and I had to re-stamp several times to get the coverage I wanted.
- Anyway, moving on....when I finally got the ink the way I wanted it I cut the paper between two of the stamped lines and added craft foam to the back. This gave me a chance to set back the sentiment. craft foam is cheaper then foam tape and gives you the same result. This is another trick I learned from Jennifer McGuire :)
- The sentiment is from the Happy Messages clear stamp set from Stampendous. I used a dye ink and it has a bit of a distressed look to it.
- After that I just adhered the stripes onto the card and trimmed them down to cover the front of the card.
This is a very easy card to make and I just loved the one Jennifer McGuire did and I had to try it. I hope you like the card! Please leave a comment below to let me know what you think. Don't forget to post your photo's in the comments, too! I love to see what everyone is making. I hope you all enjoy the rest of your weekend.
Subscribe to:
Posts (Atom)