Saturday, January 30, 2016

Hello Love

Hello Everyone and Welcome! How are all of you doing today? I hope all is well. With all the health scares and the threat of being bitten by mosquito's its a wonder anyone is traveling at all this winter. I can't afford to travel so I don't have to worry about it yet, but in Minnesota we have a large amount of mosquito's during the summer. I'm hoping that our mosquito's are different than the ones that are caring the disease. That must be unsettling to know your pregnant and you have been bitten. Such horrible things going on in our world. When I was a kid mosquito's didn't carry all of these diseases. I wonder what has  caused them to change? I hope that this finds all of you safe and well! Today I did a valentine's card of sorts. This could be used all just to say hi if you change the sentiment.


  • I used the Hello Love stamp from Unity Stamp Company. I used water coloring to paint her with my TH Distress inks.
  • I rounded the top two corners on the painting and the black layer before assembling the card together.
  • I added some sequins and then glued little pearls in the centers of them.
  • The ribbon is behind the black layer and tied in a bow on the side.
  • I used Diamond Stickles on the hearts and the words "Hello Love".
  • I adhered this to an A2 size card front and rounded only the top two corners.
That's it for this card today. It was a fairly quick card to do. I hope you like it. Stay safe, warm, and healthy. Have a blessed weekend, too! 

I plan on entering this card in the following challenges:

Cupid

Hello Everyone, Today at Outlawz.ning.com Paper a la Mode the new challenge starts and our theme this week is to make a project using two types of media. I hope that you have a chance to come join us. We have a great Design Team to inspire you.

our sponsor this week is a Day for daisies

Here is my card:
  • For this I card I started with an A2 size card in red. I used a corner punch on the top two corners.
  • I used Prisma Premiere Colored Pencils to color Cupid.
  • The A2 Rectangle Die set was used to cut cupid.
  • For the sentiment I used Wow white embossing powder.
  • I added the hearts, a bow and the Jems from my stash to add some detail to the card.
Please be sure to follow my blog and leave any comments you might have in the box below. Thank you SO much for stopping by and becoming a follower. I appreciate all of your comments and enjoy reading them. ~HUGZ~


Friday, January 29, 2016

Easter Greetings


Hi everyone and welcome! I'm so excited that you have stopped by. I'm posting a card I designed for Stamprints today. The image is beautiful! You can find this image as part of the Easter Collage. I will be using the other images from this collage in my future posts so you will have to stick around and follow my blog so you don't miss any of the up coming cards. Here is the card I have for you today!


I started by fussy cutting the image from the Easter Collage. I used a embossing folder with tan cardstock on the background. The second layer of paper is from my stock. I used washi tape across the card behind the image. I tied a small bow and added it with the button along with three pearls for a touch of detail. I will be posting the remaining images in future posts so make sure to check back often. I hope you all have time to craft this coming weekend. ~HUGZ~

Beer Can Appreciation Day


Hello Everyone and Welcome to the Outlawz.ning.com Festive Fridays Challenge. We have four fabulous Holidays to inspire our cards this week and I'm so excited to see all of your cards and projects. Here are the Holidays topics for this weeks Challenge Beer Can Appreciation DayBubble Wrap Appreciation DayIrish coffee Day, chocolate Cake Day. Don't These sound like fun!?! I have a new technique to talk about today. I chose to honor Beer Can Appreciation Day with my card. Here is my card.

  • I started out by carefully removing the top and bottom of two Beer Cans ( you can use soda cans also). I just used a kitchen shears to cut the tin. I then cut down the long side of the can so you have a rectangle of tin. Then I wiped the sticky off the inside and bent the can.
  • You will need to manipulate your tin a little bit so it will lay flat. I used my A2 size Rectangle Die set and ran the tin through my big shot. You set it up the same way you do paper and need to tape the die in place.
  • I used my second can with my Doily Heart Die and ran it through my machine. Its intricate so you  need to be careful removing the pieces so you don't get cut. I placed a bounce under my can before I ran it through. It helps to catch all the little pieces.
  • I used Powder Puff Chalk Ink to color the rectangle green and the heart red. You can use any type of paint, ink or media to color the tin. FYI...some cans already have beautiful colors and don't need to be painted. 
  • I added the Cheers sticker, beer mug along with my letters and number 2 to create my Sentiment "Cheers 2 beer cans" My finished card is 5" x 7".
I have used this technique with all my dies. It works beautifully and can really give your projects a different look. It's super pretty with butterfly dies and Colorbox Ink looks awesome. Just play with it and see what comes you may just discover you like it :) Let me know what you make and how it all turns out. Post your cards in the Outlawz Challenges, Google+ or even FB so we can see what you create. ~HUGZ~


Thursday, January 28, 2016

Reflections of Strength

Hello Everyone and Welcome, Today I have a card that I did for a Facebook challenge I belong to Called Friends Gatherink. The Challenge was to do a reflection card. Well, Reflection has several meanings and I wanted to show two of them in my card. I wanted to show someone sitting and reflecting on things in her life and I wanted to show her reflection as she sat there. I've never heard of a reflection card. I had no clue as to how to go about it but I followed the instructors direction and I think for my first time, I didn't do to badly. This is what I came up with.

  • This is a little tricky to do at first but DON'T give up. You will stamp your image as you always do.
  • Then to get the mirror image you will stamp the image onto a clean acrylic block. Now you need to huff on the image on the acrylic block several times and then stamp it at the base of the first stamp. If its not a perfect transfer but you can make out what it is PERFECT. If  it didn't transfer try again and huff on it a few more times then you did the first time. The trick is to get all the ink moistened on the block from your breath so that it will transfer, so you  might need to huff a lot. I know I did. hehee
  • once you have the mirror image transferred you will color it in anyway you like. Remember to make the mirrored image a little muted because that's the image as seen in the water. 
  • Once you have that done you can color in your grassy area using a brush, sponge or both.
  • Sponge your sky color and then use a tad bit lighter color for the water on your mirrored image.
  • Once that dries you can take a white pen, I used my Jellyroll, and draw in some squiggles in the water and along your shore line. 
  • I kept the a card pretty plain because I didn't want to distract from the image, but you could embellish it any way you see fits. The possibilities are endless with this technique.
See this wasn't that hard after all and don't you just love the look!?! It such a cool technique. I will be doing this periodically so that I can master it. I want to do something special for my Dad and my Brother. I can't believe how awesome this looks when its done. PLEASE put your blog address in the box below so I can see your Reflection cards, too. I'm so excited to see what everyone makes!! Hugz for now. Jules

I plan on entering this in the following challenges:

It's Not Just a Kiss


Hi everyone and welcome! I'm so excited that you have stopped by. I'm posting my second card I've designed for Stamprints today. The image is beautiful! You can find this image as part of the Happy Valentine's Day Collage. I will be using the other images from this collage in my future posts so you will have to stick around and follow my blog so you don't miss any of the up coming cards. Here is the card I have for you today!


I used a Scalloped Oval Die to cut the image and then framed it with a scalloped edge frame made from white cardstock. I used Diamond Stickles around the scalloped frame for detail. The piece of pink doily is from a heart shaped doily I had in my stash. The sentiment is from the collage and I put it at an angle so it would be a little eye catching and different from the norm. I added a bow and three small pearl beads to the corner to finish off the card. This collage has such beautiful images and it is super fast to making a stunning card with them. I hope that you check back. I have some of the other images from this collage coming on future posts. Hopefully you found this inspiring and your off to craft and create your beautiful projects. Please leave your blog address in the box below so I can follow you and be inspired by what you are making, too! Hugz


Wednesday, January 27, 2016

I Only Have Ears For You

So, I decided that I would just make a card for no reason other than, I had this cute stamp and I wanted to use it. It's funny how you start out without a plan to enter your card in challenges and then suddenly you come across something in your email, blogs you follow, or other DT members posts. Before you know it you have a list of challenges you want to make the card for. This is what happened to me this morning. I have to laugh because I used to make cards for challenges but with all the Design Team cards I make now a days I don't get a chance to do that very often. I will list the challenges that I will be entering this card in at the bottom of my blog. It would be awesome if you can enter the same challenges with something your making, too! I love seeing everything that you all make! I think I will be mailing this card to my Granddaughter Layla. She is 4 years old and just loves getting cards from Nana and all the pretty sparkles will put her over the top happy.

Here is my card:
  • I used a 6" x 6" card size for this project. I cut the first layer 6 x 6, the second layer 5 1/2" x 5 1/2", and the third layer 5 1/4" x 5 1/4". I used the Memory Box Stitched Circle Die set to cut the 2 circles.
  • The stamp set is "Mice of You" from Unity Stamp Company. I only used one of the images in the set and two of the sentiments.
  • I stamped the image and sentiments with black archival ink so that it would hold up to the distress inks I painted with and rubbed onto the backgrounds with.
  • I then added a paper doily behind the mouse and adhered it to the front of the card.
  • I adhered the sentiment circle and added some foam glittered hearts for dimension.
  • The blue glitter ribbon is from my stock. I bought it at the Dollar store last year and this was the first time I have been able to use it, It just seemed perfect for this card.
The card went together rather quickly and was a fun project to do. I hope you feel inspired to make something for some of the challenges I am listing below. See you there :)

I will be entering this card in the following challenges:
(I'm on the DT at the Outlawz so this will just be for fun and not part of the challenge)


Tuesday, January 26, 2016

A Mosaic Heart for Valentines


Have you ever had an idea that you just didn't quite think through all the way? I did when I thought of the design for this card. I bought a Die Doily heart from Sizzix and thought it would be really neat to do an inlay technique with different shades of pink.....here's what I did :/


I started out cutting using the die with several different shades of pink. At this point I'm still very excited about the card. I have all the cut out pieces in a pile ( here's my mistake). As you can probably already tell, I'm off to a rough start. LOL

I decided I wanted the heart red and the base of the card white with a red outline. So I glued my papers and the red heart down. When it was time to replace all the cut outs I realized that I should've kept the colors separate. I struggled most the afternoon to find the pieces I needed. I refused to give up on this project, because I just knew it would look awesome when it was done..haha here is the finished card. I added Jems for some sparkle. and stamped the sentiment at the bottom of the card. This card is being mailed so I kept it flat.


I am happy with how it turned out. I think it will be a while before I do another one. I do know that I will keep the colors separate next time. It would be fun to hear from you as to what project you did that this happened to you. We learn not only from our own mistakes but also from others. Leave your comments in the box below and share your story with all of us. Thank you for stopping by today!

Hand Made With Love

Hello Everyone and Welcome. Do you have other hobbies besides card making and scrapbooking? I think most of us in the creative world have multiple talents and work on several things at the same time. I know I do. I crochet, quill, embroider, quilt, scrapbook, paint and garden. I like to use the things I make as gifts. All of my seven Grandchildren have a blanket, or quilt, that I have made for them. I tend to give most of what I make away and I have very few things that I have kept for myself. When I was shopping at Hobby Lobby I came across a stamp set. It was only $1 and it fit perfect for cards when I give the things I make as gifts. Here is my card.

  • I wanted a quilted look to the card so I stamped each image on small pieces of card stock and then I used two TH Distress Ink colors and inked each one with a different combination of colors.
  • Once they were dry and ready I had to lay them out and make all the cuts needed to give it the quilted look while staying A2 size.
  • I had the purple trim with the buttons in my stash so I placed each piece and cut them to the sizes I needed to fit the quilting.
  • The button is from my stash and I ran some cotton thread through to make a bow.
Isn't this little set awesome!?! I picked up the "Hand Made With Love" stamp at Michael's it was in their $1 rack. I just knew it would work perfectly and it did. I love making finds like these. Making the card feels so rewarding knowing I only have a couple dollars invested in it and it looks like I spent a lot more on the set. I hope you have finds like these once in awhile, too. I hope you have a safe, warm and blessed day.

I plan on entering this in the following challenges:


Monday, January 25, 2016

Thanks so much

Hello and welcome! Grab a coffee, or beverage of your choice and pull up a chair. I'm happy you are here for a visit :-D I love CAS cards. They are so elegant, pretty and fit every occasion. I also love one plus white cards. Red and white are probably my favorite. For today's card I took both of these ideas and made a Thank you card. I love sending thank you cards. It is probably the type of card I send out the most. I like to use them just to say Thank you for being such a great friend, or for being a part of my life. What type of card do you use the most? Here is my card.

  • I started by making my card base, 6" x 6", out of red card stock.
  • The white card stock was cut 5 1/2" x 5 1/2". I used the Hill Die to cut the white card stock       1 1/2" up from the bottom.
  • The red strip was made by using the Hill Die on the same red stock as the card base. I cut it so that it was thinner on the left tan the right.
  • I ran the bottom portion of the white card stock through my Big Shot using a Dot Embossing Folder. 
  • The top portion of the white card stock was embossed the same way using a Flower Embossing folder.
  • I used the Heidi Swapp Thank You Die on the dotted portion. Making sure to save the small white pieces so I could add them back in when I put everything together.
  • After I glued the red strip to both of the white card stock portions I shortened the top so that it was still 5 1/2" square.
  • Then I adhered the panel to the red card stock and glued the portions of h,y, and into place.
  • The small circle, thanks so much, is from a Studio G set. It was cut out using the smallest circle of the Stitched Circle Die set from Memory Box. I used foam dots to adhered it to the card for dimension.
  • The red Jems were added for a tiny bit of detail. Plus I just love using Jems on my cards.
It seems like a lot of steps but the card does come together rather quickly and just looks like it took you all day to make. I hope you find this inspiring today. I love reading your comments and following your blogs so please remember to visit the box below. As always feel free to leave your blog address. I enjoy visiting your blogs and finding inspiration in everything you make, too. Have a safe and blessed day Everyone ~HUGZ~

I plan on entering this card into the following challenges:


Saturday, January 23, 2016

Cinderella

Good Morning Everyone. How are you doing? I suppose a lot of people are getting ready for their winter vacations about now. I on the other hand am getting wound up to do several cards in the next few months that will show you how to stretch your supplies and have a larger amount of options available to you. Today I made a card that is a cut using a die set that I have.

The Theme at the Outlawz.ning.com Paper a la mode is to make a 
different shaped card (other than A2). Our sponsor for this challenge is

Here is my card

I plan on entering this in the following challenges:
word art wednesday
sunday stamps
lil patch of crafty friends
aliciabel challenge blog

  • I started out with a standard A2 Card (4 1/4" x 5 1/2") and I set my die so that the left edge was hanging over the card fold. By doing this the fold stays in tacked. 
  • I used Prisma Color Pencils on my image and cut the image with the same set of dies.
  • She needed some sprucing up so I used the same set of dies to make a pink and a blue frame for her.
  • All that was left was to carefully adhere each piece to the card. 
  • I added a bow and some Jems for a little detail and the card is done.
Your Die sets can do so many things. When I first get a new set I take my scrap paper and play with them to get an idea of how I can use them.Some dies are very detailed almost like a screen or an overlay but...if you started to play with them you can cut pieces off and even use them to make different types of cards. If you have time someday sit down and just play with them with no card goal in mind. See what you come up with. It's fun and a great way to think outside the box. Happy Crafting Friends!

Friday, January 22, 2016

National Popcorn Day!

Hello everybody are you ready for our third challenge at Outlwaz.ning.com? We have chosen four different Holidays for our Festive Fridays Challenge. The Holidays are  Appreciate a Dragon DayNational Popcorn DayPenguin Awareness DaySquirrel Appreciation Day. I hope you can join us for some fun creating projects inspired by one or more of these days. My card this week was inspired by National Popcorn Day.

  • I started by stamping the Love bug Stamp from Unity Stamp Company and water color painting it. 
  • I hand drew the drive-in speakers and added the embellishments.
  • To make the dropped popcorn I took tiny white poms and glued them into clusters of three and then brushed yellow paint on them for the look of butter.
What a fun project! I hope you enjoyed the card and am now inspired to create your Festive Friday projects. Don't forget to follow my blog so you don't miss anything. If you are already a follower I want to thank you  for your dedication and interest in the things I create. Have a blessed day everyone. ~HUGZ~

I plan on entering this in the following challenges:
the unity stamp co-challenge
word art wednesday
lil patch of crafty friends

Thursday, January 21, 2016

Little Princess

Well, January is almost over. Can you believe it? It seems like Christmas was just last week. I'm a Guest Designer today at outlawzchallenges.ning.com for the Thursday Twist Challenge. 

Our sponsor for the Challenge is:

The Theme for the Challenge is Babies and Toddlers. So I decided to do a card for a Baby Girl Shower. I first saw a card done similar to this by one of my crafty friends Lois Wyche at http://lilartsywoman.blogspot.com/2015/12/tuesday-tall-and-skinny.html The card was so darn cute I knew I would have to do one. Here is my card:


To make this card I started with the pink wall and quickly decided to add the wood patterned paper along the bottom to appear as if its the floor of a bedroom. I added a piece of edging to cover the seem and give it a baseboard appearance. The image was colored with Prisma Color pencils and fussy cut for the card. I had the embellishments in my stash. I put the measurement edging across the top of the card to appear as if it is wall border and then added Jems for sparkle.

This card was SO much fun to make. It will be a great Baby Shower card for one of my newly married nieces. Please remember to leave your comments below. I would love to see you join us at the Outlawz Challenges so come check them out. We have a different type of Challenge for each day of the week so I'm confident you will find something that fits your type of crafting. Thank you for stopping by and have a Blessed Day!

Stamprints Easter


Hi everyone and welcome! I'm so excited that you have stopped by. Today is the first time Stamprints has posted their cards and I was asked to do some design work for them. They are off to a great start and I can't wait to see what their future releases will be. You will have to stick around and follow my blog so you don't miss any of the up coming releases. Here is the card I have for you today!
  
We have our next posting set up for February 2nd so make sure to stop back. I'm looking forward to showing you what we have going on. I love reading your comments so don't forget to leave a comment telling me what you think in the box below. See you soon ~Hugz~

I plan on enter this in the following challenges:
sunday stamps
word art wednesday
simon says wednesday challenge


Wednesday, January 20, 2016

Isabella to the Moon and back

Hello Everyone! How are you today? I'm wondering how everyone handles a mistake on a card. Do you scrap the whole thing and start over? Do you spend time trying to change your layout so you can cover it up somehow? Do you repair it to the best of your ability and hope nobody notices. I struggle with this because my OCD wants to scrap it and start over but the amount of time I have and all the projects I need to get done never allow me the time to do that. I find myself spending a lot of time trying to fix my mistakes...I think this actually takes longer than if I would just scrap it and start over sometimes. Well, I made an error with the card I made today. I spent a lot of time repairing it and I often wonder if anyone can even tell there was an oops...Here's the card I did let me know if you can spot my oops. I'm not sure I repaired it very well..Hahaha

The image is one I received as a prize on an Outlawz.ning.com Challenge in November. She is from A & T Digi's Emerald Fairies and her name is Isabella. Isn't she precious!?!
The Moon and sentiment are from Stamprints Designs.

  • I started with Isabella on a 4" x 6" water color paper. I erased the image so the Ink from my printer wouldn't smear. This is a great trick and works every time to remove the ink that is sitting on the paper and it prevents smearing with several types of media.
  • I water colored the image and then I used Stormy Sky Distress ink to do the clouds. I wanted to give a evening feel to the card.
  • Then I added the moon and sentiment along with some enamel dots to give the card a little detail. Of course, I had to add Stickles to the wings, too.
I did these clouds yesterday on a card I posted and they just seemed to fit this little image so well that I did them again. I love your comments so please visit the box below and don't forget to leave your blog address so I can follow you in return. It's fun to be inspired by other's and I love seeing what your doing to. Hugz Everyone :)

Tuesday, January 19, 2016

Wood You be mine?

Hello Everyone, I'm so happy you have stopped by today. I'm not sure how you feel about winter and all the cold weather we have been having but as for myself? I'm ready for the February warm up that we usually get here in Minnesota. It was -12 when I got up this morning again Bbbrrrrrr and I didn't even mention the windchill. It has been like this for 2 weeks now and the cold just whistles its way right into the core of your bones. I have a space heater in my craft room and its aimed at my feet....LOL Today's card is of warmer weather, green grass and blue skies. I bought the image from Whimsy Stamps and the name of the set is "Wood You Be Mine."

Here's the card:


  • I started by stamping my image on 4 1/4" x 5 1/2" water coloring paper with Black Archival Ink.
  • I started out the sky by making a scalloped edge and then sponged, TH Stormy Sky, Broken China and Salty Ocean randomly around the paper to form clouds.
  • After I was done with the sky I painted the grass with TH Mowed Lawn and placed the shadow behind her and off to her left.
  • I used Wild Honey and Vintage Photo to do Her hair and Candied apple for the heart charm in her hair.
  • I used Faded Jeans to paint her pants and Candied Apple on her shirt and shoes. 
  • Her skin was painted with Spiced Marigold and Spun Sugar on her cheeks.
  • When I stamped the Banners I used Candies Apple to highlight the words " Smile and Mine."
  • Of course I had to add Jems because I love them :)
It felt summery just making it and the clouds turned out great! I hope you try this technique out with other projects. It's really easy and quick to do. Please remember to leave your blog address (if you haven't already) so that I can come visit you and become a follower. I would love to see what you are making and get the chance to be inspired by you! Thanks Everyone and have a blessed day!


I plan on entering this card into the following Challenges:

Saturday, January 16, 2016

a twist on a "Z" fold

Hello Everyone, I hope your Saturday is off to a GREAT start. It's blustery cold here in Minnesota and the temps just keep dropping. I'm so glad February is almost here. We always warm up in February and get most of our snow. The good thing about it is that the snow melts pretty fast :) A Dear friend of mine made a "Z" fold card and it was gorgeous. I told her that it was super cool because it reminded me of a room in a house. We decided to see what it would look like with a window in the card. She has a different type (more versatile) window than I so we both made a card to see what they look like.
Here is her card: LilArtsyWoman.blogspot.com

Her card is Beautiful! I love the lace curtains and the fact that she even made a door with a wreath on it just darling. She even has a Cuckoo Clock on the wall. How cute is that!?!

Here is my card:

I have to say I like her card a lot more. Her window type looks so much better than this one. I tried to add curtains but it just didn't seem to look right because of the arch on top. Oh, wow, I just realized something.....I should've used a solid material and went above the arch to make the window appear as though it was a standard rectangular window....LOL I will try that for sure! I hope that you have enjoyed our cards. We both had a good time making them. It would be really neat to see what all of you can come up with to make a card like this and post it so we both can see. Have a Fantabulous weekend! ~HUGZ~

Friday, January 15, 2016

Hats Off To National Dress Your Pet Day

Hello everyone, On the outlawz.ning.com we have a new Challenge for each day of the week. Today is Festive Friday! We have chosen four different things to Celebrate this week for our Challenge. The idea is for you to find inspiration from one or more of the Holidays and make a project relating to it/them. This weeks Holidays are  Step in a Puddle and Splash Your Friend's DayFeast of Fabulous Wild Men DayDress Up Your Pet DayNational Hat Day. Don't these sound fun!?! I chose to do two of the days on one card this week. My card is for Dress Up Your Pet Day and National Hat Day. Here is my card.
I will be entering this card in the following Challenge #TGIFC38


  • I decided to do a step card format the dimensions are:
Card stock : 5 1/2" X 8 1/2"
Measuring on the long side mark with a pencil
at 1" x 2 3/4"  and 6 3/8" x 2 3/4"
cut from the 1 " mark to the 6 3/8" mark 2 3/4" from the edge
Now you need to score the side you want the step on (either side will work)
score at 1" 2" 3 1/8" and 6 3/8" only to the cut line.
Now score at 4 1/4" all the way across the card.
Now you can do the folding and you have your card base done :)

Isn't that an easy card to make? It looks so nice finished and gives you so many more designing options. I love it and I hope you do, too. I will be doing other fancy folds as we progress through the year and I will include all the dimensions in my tutorials so you can make the cards too. I hope you remember to follow my blog so you don't miss anything.

Celebrate National Hat Day!

Hi everyone, Did you know its National Hat Day? At the Outlawz.ning.com Festive Friday Challenge We are Celebrating Step in a puddle and splash your friend's day, Feast of Fabulous wild men day, dress up your pet day and National Hat Day. The idea is to create a project relating to one or more of these topics. This is SO much fun, right? I was inspired by National Hat Day and here is my card.


  • I used distress ink to make the background and then I water colored the Nancy Girl stamp from https://www.unitystampco.com/
  • The sentiment is from my stash and I picked up the hats at Joann Fabrics.
This is our second week with the new Challenge and thus far it has been a blast. The cards the other DT have done this week and last have been awesome and extremely creative. I hope you get a chance to come join us and get involved. We have a different themed Challenge for each day of the week so I can promise you will always be inspired and have a lot of fun. See you all soon! Hugz


Tuesday, January 12, 2016

Owl We need is each other #176


CHALLENGE #176


Hello and welcome everyone. Today is my first post as a member of the Design Team at Addicted To Stamps and More. 

Our Sponsor this week is
Prize is a $10 gift certificate

I'm so excited to have this opportunity to work with all the Designers here and to share my cards with all of you. Today's challenge is Anything Goes. My card today is a reflection of love and friendship and how you can find these in the most unexpected people in our lives. Here is my card.
  • To start I used the "Going to be owl-right" stamp set from www.unitystampco.com
  • I used water colors to paint him and I cut the sheet to an A2 size card and adhered it to the card base.
  • I used a Scalloped Square Die to cut the window out of the white card stock. 
  • After I made the window opening I used the dot embossing folder for some dimension and detail.
  • I glued 2 pieces of craft foam together. They are cut slightly smaller then the card size. I made the window opening slightly larger then the scalloped square opening.
  • I adhered all the pieces together and fussy cut a heart shape that I stamped the sentiment onto.
  • I decided to use white embossing powder on the sentiment for a bit of pop and added a Jem on the heart.

To me this stamp is trying to say that sometimes the people you love or whom you are closest to isn't exactly the same as you but if you give it a chance it works out. It seems like a simple concept but sometimes we go by how someone looks or what they do and we don't try to make a connection with them. I encourage you to get to know people before you make an opinion. You never know what can, or will, happen. I hope you have a great day! 

I plan on entering this card in the following challenges:
http://www.theunitystampco-challenge.blogspot.com/

Sunday, January 10, 2016

Love ya

Are you enjoying your Sunday? It's 26- windchill here and the big football game today is being played outdoors..BRrrrrr! We are going to watch the game with family in a nicely heated home. How many of you would watch outdoors in this kind of cold? Today my card was inspired by friendship and how everyone needs friends to make life better. It's so important to have somebody you can talk to about anything without judgement. I found out that I have a fantastic group of friends and I couldn't get through he difficult times in life with out them. I pray that everyone reading this has a friend, or group of friends, just like this in their lives. Don't forget to let them know how important they are in your life. This is for you and all my beautiful friend out there.

I used a Digi from A & T Design's. She is one of the Emerald Fairies and her name is Jewel. I  received as part of a prize in November from an Outlawz.ning.com Challenge. Isn't she adorable!?! I used Distress Markers to water color the image and added Diamond Stickles to the hearts and wings. The Sentiment stamps are from Unity Stamp Company and are in the Life is Better Stamp set. I hope all of you are in my life for years to come and just know I appreciate each and everyone of you. Have a blessed day! 

I will be entering this into the following challenges:

can you case it


Happy valentine's Day Card

Hi there, February is getting closer and with that brings us to another Holiday. Valentines Day! It's a wonderful chance for those who have loved ones to make them feel special. Taking the time to make a special card with somebody special in mind is one of the best ways to let them know you love them and to show them how much you care. When you make a card for somebody you but your heart into it. I have made a Valentine's card for someone special in my life and I'm going to share it with you first.

  • I started with a piece of pink cardstock and a embossing folder.
  • I used the Sweet 16 stamp from Unity Stamp Company and water colored her. After she was dry I fussy cut her out. I used foam dots to adhere her to the pink embossed paper.
  • The sentiment is also from Unity Stamp Company. It was included in one of the Grab bags I purchased during one of their sales.
  • I kept the embellishment light with a few Jems and a polka dotted bow.
So that is the card for today. It was fun to paint and make. The best part is that I made it for somebody special and I know that the card will be appreciated. I hope that you get time to make something for the people you love in your life, too! I love reading your comments so please stop by the box below and let me know what you think. ~HUGZ~


Saturday, January 9, 2016

Be Mine

Hello and welcome to the first challenge of the New Year at the Outlawz.ning.com Saturday Paper A La Mode. This week we are doing a Valentine Theme and the Design Team and I have really gone all out with inspiration. I hope you can join in on the fun.

Our Sponsor for the Challenge is:

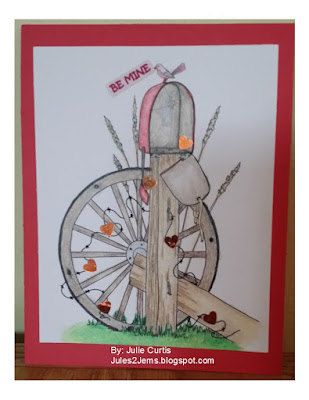
The image is from Beccy's Place and here is my card:
  • I used Prisma Premier Colored Pencils to color the image.
  • The hearts are from my stash. I placed them along the barbed wire as though they are falling out of the mailbox.
  • Then I placed the sentiment as though the little bird is making the delivery. 
The images from Beccy's Place are so detailed and fun to use. Valentine's Day is quickly approaching and sharing your love for somebody is so rewarding. I enjoy this time of year. People open their hearts just a little bit more and express their feelings for one another. Hopefully this inspired you to craft and express yourself through your art talents. Please remember to leave your comments in the box below. I look forward to reading them and getting to know you a little bit better. ~HUGZ~